How to Fix PLA Oozing After a Pause on a Bambu Lab X1 Carbon
Use custom Bambu Studio pause G-code for magnet inserts: park, cool, wait, reheat, purge, wipe, and resume without dragging an ooze strand across the print.
Some links on this page go to Amazon. As an Amazon Associate, ButterySpace earns from qualifying purchases, at no extra cost to you.
Pausing a print sounds like the simple part of 3D printing. The printer stops, you do your thing, you press resume. We thought so too, right up until we started pausing prints to glue magnets into them.
Some of the things we print have magnets sealed inside them, fridge magnets and snap-shut boxes mostly. The workflow is exactly what you would guess: print partway, pause at the pocket layer, add a drop of super glue (opens in a new tab), set the magnets (opens in a new tab), wait for the glue to grab, then resume so the next layers close everything in.
The problem was what came back after pressing resume. Every single time, the nozzle returned to the part trailing a thin strand of PLA, two or three inches of it, and dragged it straight across the print. On a rough functional part you can shrug at that. On something where the top face is the whole point, a fridge magnet, a gift, anything you want to show off, it was ruining prints.
We fixed it with a custom pause routine in Bambu Studio, and it has been boringly reliable since. The full G-code is in step 4 below if you want to grab it and go. The rest of this page explains what it does and how to tune it for your own setup.
What was actually going wrong
The stock pause on our X1 Carbon was one line of G-code:
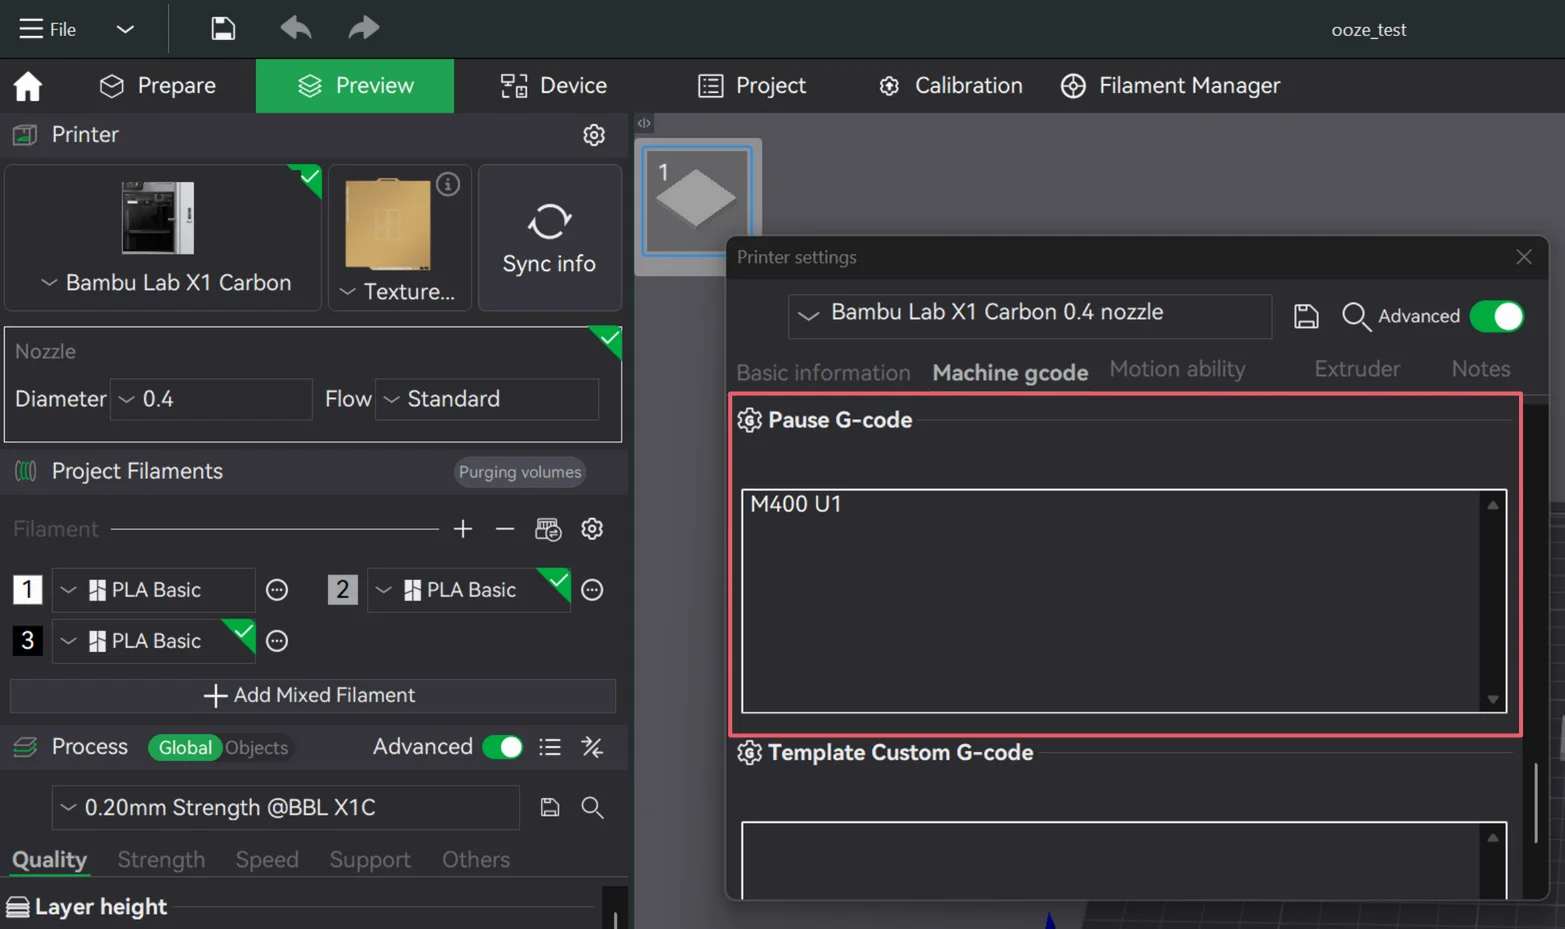
M400 U1That command stops the printer and waits for you to press resume. Nothing more. For a thirty second pause it is fine. Our pauses ran several minutes, because super glue needs time to set before layers start landing on top of the magnets.
For those minutes the nozzle sat at 220°C doing nothing, parked right where it stopped. Hot PLA does not wait politely. It oozes. By the time we pressed resume there was a strand hanging off the nozzle, and the printer's first move was to carry it back over the part. The damage showed up as:
- random strings glued onto the top surface
- bumps and scars over the magnet pockets
- a weak, gappy first line after the resume, because the nozzle had partially drained itself
- the occasional dead part when a strand got trapped under the next layer
So the fix was never going to be "pause more carefully." The pause itself had to do more work.
What we wanted the pause to do instead
On paper the wish list looks long, but it is one continuous motion:
- Reach the pause layer and lift off the part.
- Park the nozzle over the waste chute at the back of the machine.
- Cool to 170°C so it stops oozing while we work.
- Pause and wait for us to glue and place the magnets.
- After we press resume, wait four more minutes on its own so the glue can set.
- Reheat to printing temperature.
- Purge the oozed, half-cooled filament into the chute.
- Wipe the nozzle clean, prime it, and get back to printing.
The four minute timer turned out to be the sleeper feature. We used to stand at the printer watching glue dry, literally. Now we place the magnets, press resume, and walk away. The printer runs the clock.
The setup this was written on
- Printer: Bambu Lab X1 Carbon
- Material: PLA, printing at 220°C
- Slicer: Bambu Studio 2.7.1.57
- Job: pausing mid-print to glue magnets into pockets
The temperatures in this routine are PLA numbers. If you print PETG, ABS, ASA, or TPU, the structure still applies, but change the cooldown and reheat temperatures before you trust it, and run a test.
Why not just clean the nozzle by hand?
You can, and it helps. We did it for a while: hover near the printer, snag the strand with tweezers right before pressing resume. But it is a race you eventually lose. The nozzle keeps oozing while you wait, sometimes a wisp survives the tweezers, and sometimes you are across the room when the glue is ready. For a one-off print, tweezers are fine. For something you print over and over, the printer should clean itself the same way every time. Consistency is the whole point.
One thing before you change anything
Do not put this routine in your everyday printer profile. It cools, waits, reheats, and purges on every pause, which is exactly right for magnet inserts and exactly wrong for a quick mid-print filament check on a normal job.
Bambu Studio makes this easy to get right. When you edit a stock system preset, it will not overwrite it. It asks you to save the change as a copy, so your normal profile stays untouched. You will see that happen in step 5. If you are starting from a custom preset you already made, give the copy a new name in the save dialog instead of saving over it.
Setting it up in Bambu Studio
Step 1: open the printer settings
With your project open, find the printer card at the top left of the Prepare or Preview tab and click the small edit icon next to the printer name. The tooltip reads "Click to edit preset".

Step 2: open the Machine gcode tab
The printer settings window opens on Basic information. Click the Machine gcode tab.

Step 3: scroll down to Pause G-code
This tab holds every G-code block the printer runs at fixed moments: machine start, machine end, layer change, and the one we are here for. Scroll down past Machine start G-code and Machine end G-code.

Eventually you reach the Pause G-code box. Ours contained exactly the one line we met earlier:
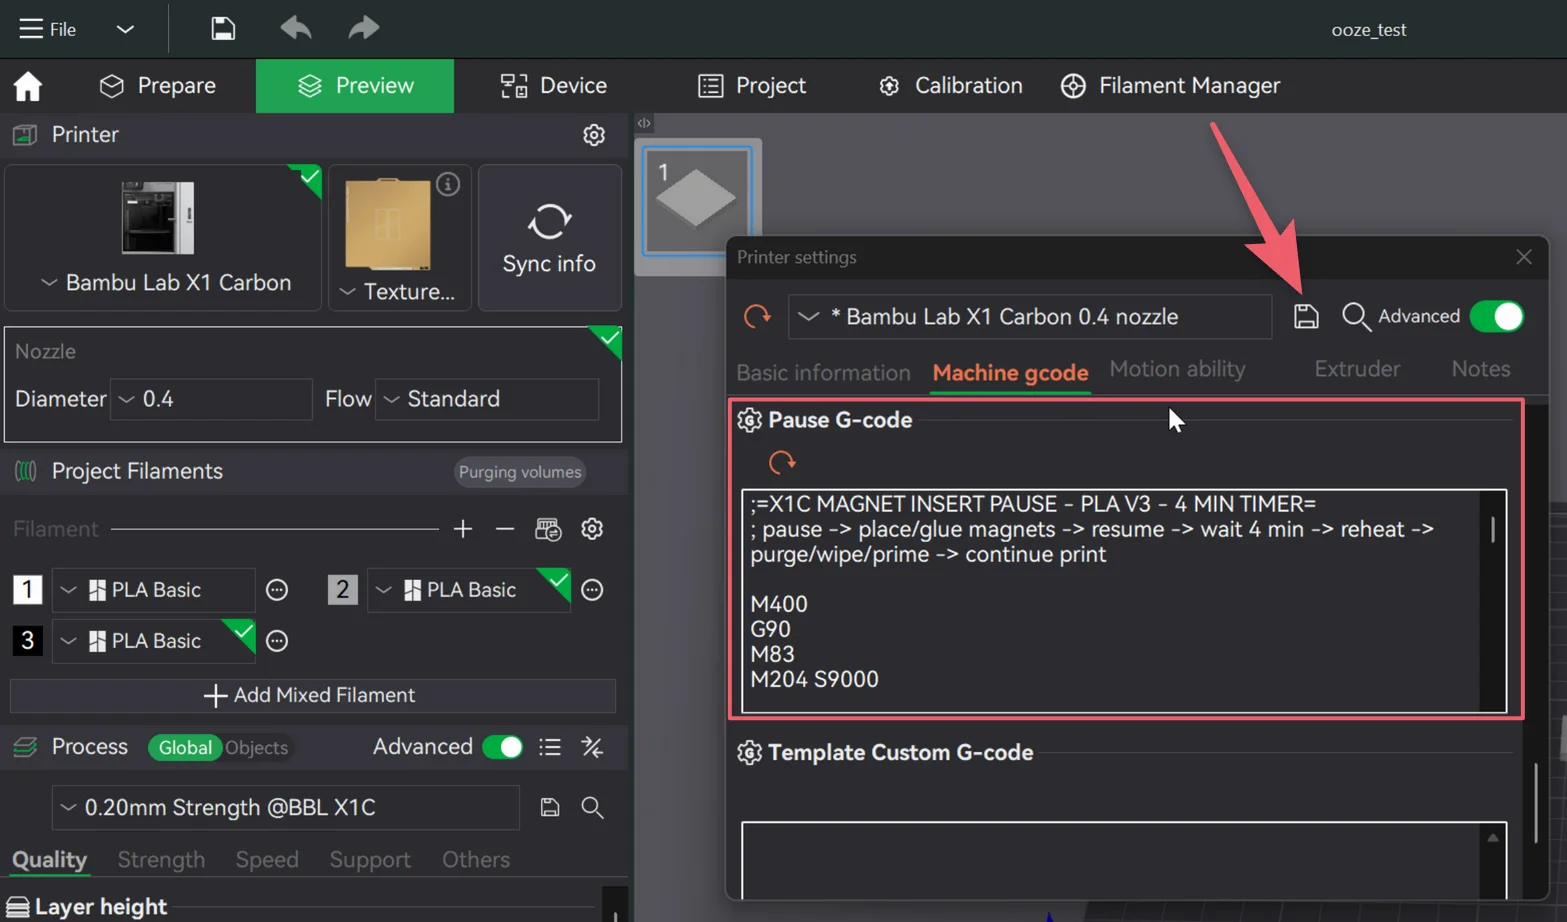
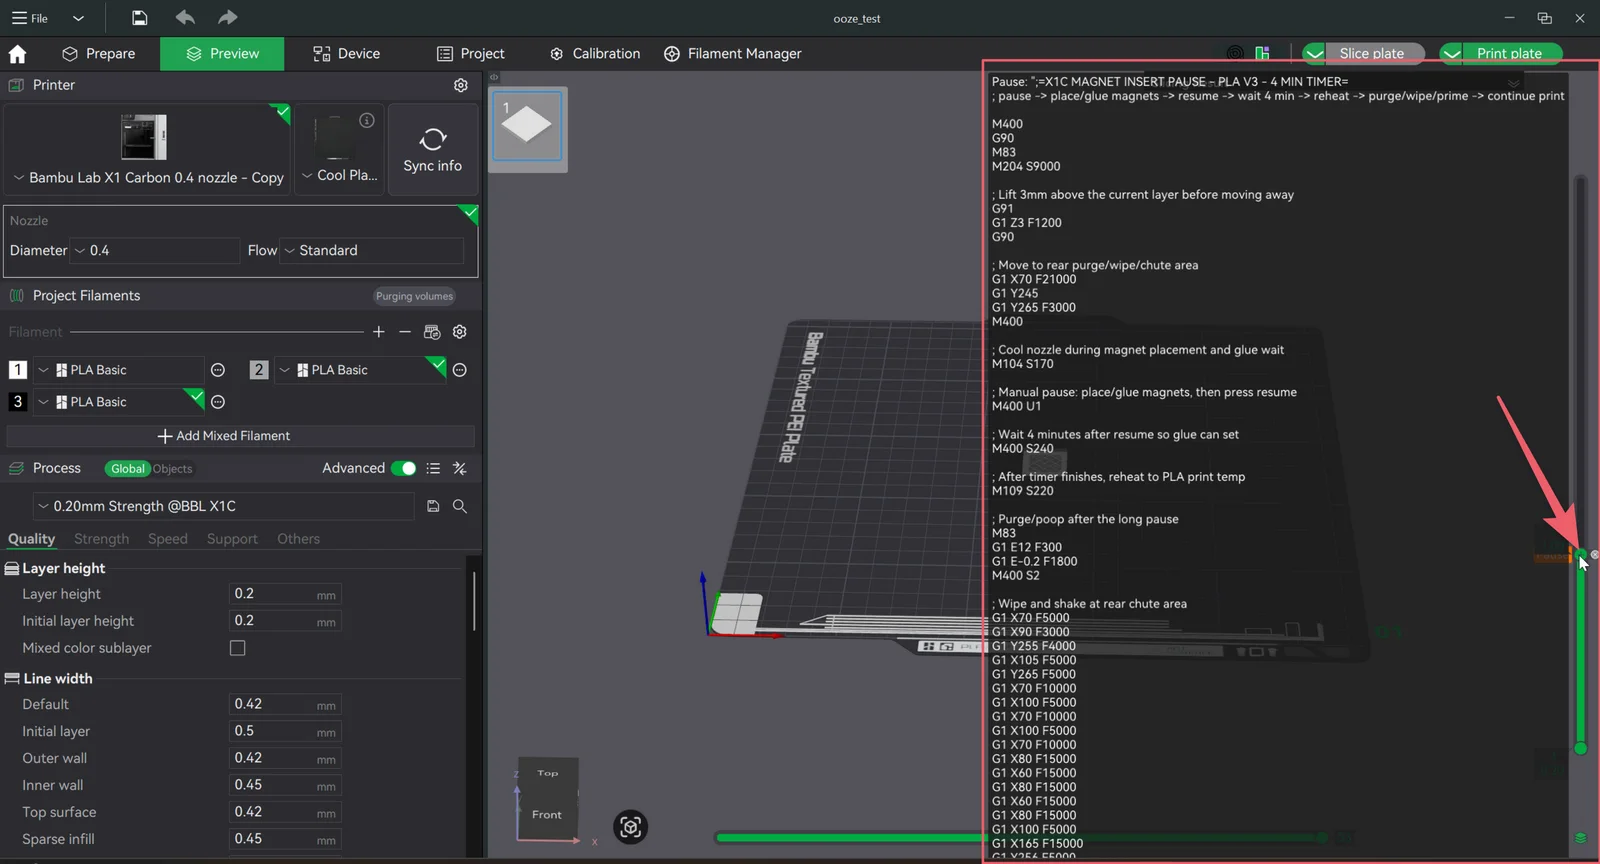
Step 4: replace it with the custom routine
Select everything in the Pause G-code box and paste this in its place. This is the exact version we run, four minute glue timer and all (it starts collapsed, so expand it or just hit Copy):
;=X1C MAGNET INSERT PAUSE - PLA V3 - 4 MIN TIMER=
; pause -> place/glue magnets -> resume -> wait 4 min -> reheat -> purge/wipe/prime -> continue print

M400
G90
M83
M204 S9000

; Lift 3mm above the current layer before moving away
G91
G1 Z3 F1200
G90

; Move to rear purge/wipe/chute area
G1 X70 F21000
G1 Y245
G1 Y265 F3000
M400

; Cool nozzle during magnet placement and glue wait
M104 S170

; Manual pause: place/glue magnets, then press resume
M400 U1

; Wait 4 minutes after resume so glue can set
M400 S240

; After timer finishes, reheat to PLA print temp
M109 S220

; Purge/poop after the long pause
M83
G1 E12 F300
G1 E-0.2 F1800
M400 S2

; Wipe and shake at rear chute area
G1 X70 F5000
G1 X90 F3000
G1 Y255 F4000
G1 X105 F5000
G1 Y265 F5000
G1 X70 F10000
G1 X100 F5000
G1 X70 F10000
G1 X100 F5000
G1 X70 F10000
G1 X80 F15000
G1 X60 F15000
G1 X80 F15000
G1 X60 F15000
G1 X80 F15000
G1 X100 F5000
G1 X165 F15000
G1 Y256 F5000
M400

; Final small prime so the nozzle is not dry when it returns to the part
G1 E0.8 F300

; Tiny final wipe after the prime
G1 X145 F10000
G1 X165 F10000
G1 Y256 F5000
M400

; Keep printer in normal sliced-toolpath modes
G90
M83

; Restore acceleration
M204 S9000Then click the save icon at the top right of the window.
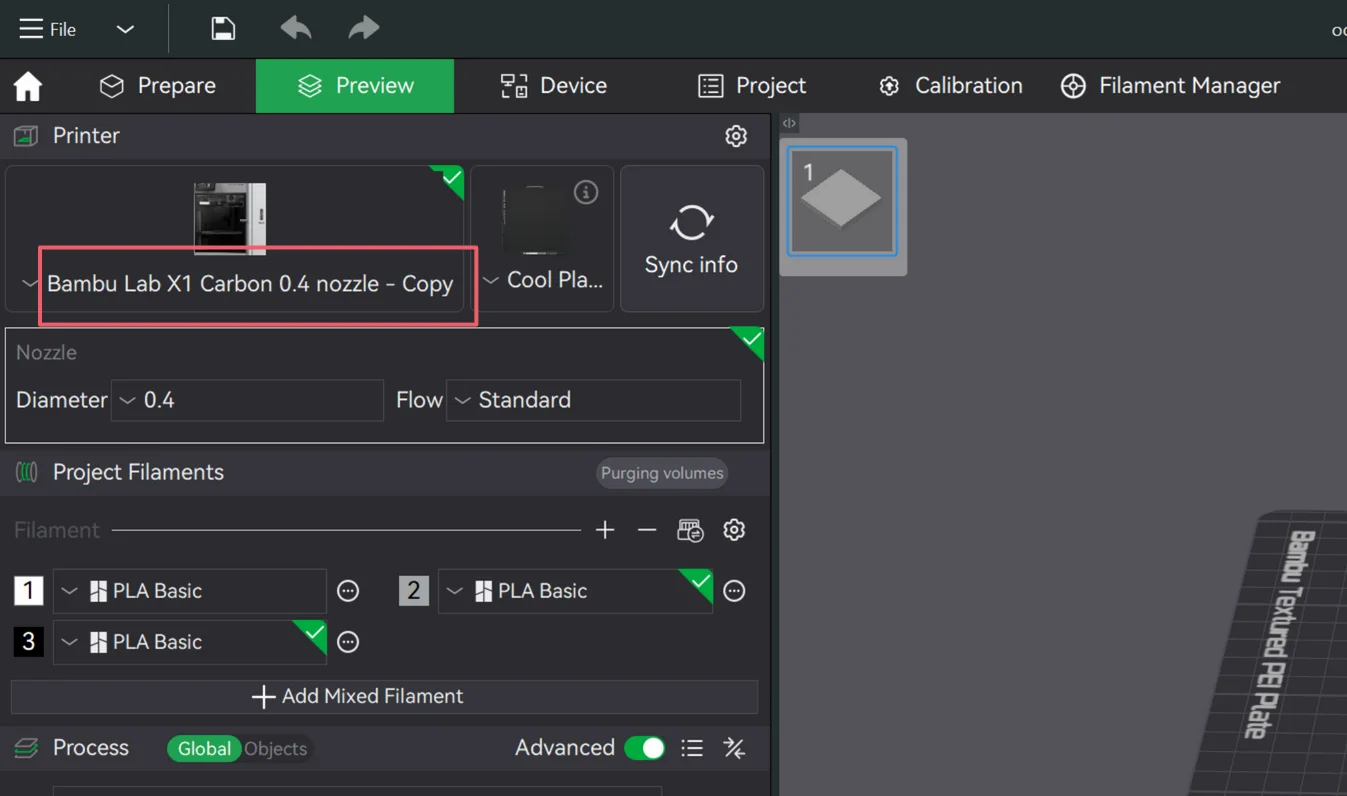
Step 5: save it as a User Preset
Bambu Studio now asks where the modified preset should live, and this choice matters more than it looks:
- User Preset saves the copy to your preset library, so it shows up in the printer dropdown in every project from now on.
- Preset Inside Project embeds the copy in this one project file only. Open a different project and it is not there.
For a routine you will reuse across projects, pick User Preset. We kept the default name, which just tacks "Copy" onto the original. If you expect to collect a few custom routines, a clearer name like "X1C PLA Magnet Pause" saves some squinting at the dropdown later.

After you confirm, the active printer profile switches to your new copy. You can flip between this preset and your normal one from the printer dropdown whenever you want.
Step 6: add the pause like you always have
Nothing about inserting the pause changes. Slice the plate, drag the layer slider in the preview to the layer where the magnets go in, right click the slider, and choose Add Pause. Because the routine lives in the printer preset, that ordinary pause now triggers the whole park, cool, wait, purge, and wipe sequence. Hover over the pause marker and Bambu Studio shows you the custom G-code attached to it.
One thing not to do: do not also paste the routine into the per-layer custom G-code box. The preset already covers it, and doubling up runs the whole sequence twice.
Step 7: test it on a scrap part
Before you run this on a print that matters, do a small test on a scrap part and watch the first resume happen. You are checking that the printer:
- pauses at the right layer and parks over the rear chute
- cools to 170°C while you place the magnets
- waits four minutes after you press resume
- reheats to 220°C, purges, and wipes
- lays down a clean, fully extruded first line back on the part
It is ten minutes of babysitting that buys you a routine you never have to watch again.
What each part of the routine does
Park and lift
M400
G90
M83
M204 S9000

G91
G1 Z3 F1200
G90

G1 X70 F21000
G1 Y245
G1 Y265 F3000
M400
M400 lets any queued moves finish so nothing below fires early. G90 and M83 set absolute positioning with relative extrusion, which keeps the purge math later dead simple. The G91 block lifts the nozzle 3 mm off the current layer so it cannot drag across the part on the way out, and the X and Y moves park it over the waste chute at the back of the X1C. That is the core idea of the whole routine: whatever oozes during the pause now lands in the chute, not on your print.
Cool down while you work
M104 S170170°C is warm enough that the nozzle recovers quickly when it is time to print again, and cool enough that PLA mostly stops oozing. We tried colder first, and the restarts came back under-primed, with the nozzle taking too long to flow. 170 was the number that held up.
The pause itself
M400 U1The same stock command as before, just no longer doing the job alone. The printer stops here and waits. This is where you glue the pockets, set the magnets, and press resume on the screen.
The four minute glue timer
M400 S240This holds for 240 seconds after you press resume. The ordering is the trick: the wait happens before the reheat, so the nozzle sits at 170°C while the glue sets instead of oozing at full print temperature for four more minutes. Place magnets, press resume, walk away.
Reheat and purge
M109 S220

M83
G1 E12 F300
G1 E-0.2 F1800
M400 S2
M109 reheats to 220°C and blocks until the nozzle actually gets there. Then the extruder pushes 12 mm of fresh filament through the nozzle and into the chute, flushing out whatever oozed or half-cooled during the pause. The small retract right after keeps the purge blob from following the nozzle out of the chute.
Wipe, shake, prime, wipe again
The long block of X and Y moves after the purge is a wipe and shake pattern across the chute area: slow passes to scrape the nozzle, fast direction changes to flick the purge blob and any clinging string loose. It looks ridiculous in the preview. It works.
G1 E0.8 F300That small prime near the end exists because of a failed test. In an early version, the printer came back from the pause, moved like it was printing, and extruded nothing for the first few seconds. Cooling, purging, and wiping had left the nozzle slightly drained. The 0.8 mm prime tops it back up, and one last short wipe clears whatever the prime left hanging before the nozzle heads back to the part.
Tuning it for your setup
Our numbers are a starting point, not gospel. Five values do nearly all the tuning:
| Knob | Line | Raise it when | Lower it when |
|---|---|---|---|
| Purge amount | G1 E12 F300 | the first line after resume is weak or missing | the purge wastes filament or leaves a big blob |
| Final prime | G1 E0.8 F300 | the resume still starts dry | the nozzle carries a blob back to the part |
| Cooldown temp | M104 S170 | restarts feel sluggish or under-primed | PLA still oozes during the pause |
| Glue timer | M400 S240 | your glue needs longer to set | you want a shorter buffer |
| Reheat temp | M109 S220 | match this to whatever your filament actually prints at | |
The timer math is just seconds: M400 S60 is one minute, S120 is two, S300 is five. Whatever you pick, keep the wait before the reheat. That ordering is what keeps the nozzle cool through the glue set.
If you print a different material entirely, copy the preset again and change both temperatures, the S170 cooldown and the S220 reheat, to numbers that suit that filament. Then test. PETG and ABS behave differently enough at a parked nozzle that we would not promise this exact routine transfers untouched.
The workflow once it is set up
- Pick the custom preset from the printer dropdown.
- Slice, then Add Pause on the magnet layer in the preview.
- Send the print and go do something else.
- When it pauses, glue the pockets and place the magnets.
- Press resume and walk away. The printer waits four minutes, reheats, purges, wipes, primes, and carries on.
- Come back to a sealed part with a clean top surface.
Magnets are our case, but nothing here is magnet-specific. Nuts, threaded inserts, RFID tags, weights, captive hardware of any kind: every long mid-print pause has the same ooze problem, and the same routine fixes it.
Why this beats the stock pause
The stock pause waits. That is the entire feature. The custom routine answers each failure in the chain one by one:
| Problem | What the routine does about it |
|---|---|
| Nozzle parks over the part | Parks over the rear chute instead |
| PLA oozes during the glue wait | Cools the nozzle to 170°C |
| Glue needs time to set | Runs a four minute timer after resume, before reheating |
| Oozed filament hangs off the nozzle | Purges 12 mm of fresh filament into the chute |
| The purge blob clings on | Wipes and shakes it loose |
| The nozzle comes back drained | Primes 0.8 mm before returning |
| A last wisp rides back to the part | One final short wipe |
The thread running through all of it: the printer never goes back to the part dirty. It cleans up first.
Mistakes that will bite you
- Doubling the pause. Change the preset's Pause G-code, then use the normal Add Pause. Do not also paste the routine into the layer's custom G-code box.
- Making this your default profile. Every pause on every print would cool, wait four minutes, and purge. Keep it as a separate preset you select on purpose.
- Forgetting the reheat temperature.
M109 S220is our PLA number. If your filament prints at 215, that line is now wrong for you. - Skipping the test print. Custom machine G-code earns trust on a scrap part, not on the print you actually care about.
Quick answers
Why does my Bambu X1 Carbon string after resuming from a pause?
During the pause the nozzle sits at print temperature, so filament slowly oozes out of it. When the print resumes, that hanging strand gets dragged across the build plate or the part. The fix is to park the nozzle away from the print, cool it during the pause, and purge and wipe before it returns.
Can the printer wait on its own after I press resume?
Yes. M400 S240 makes the X1 Carbon wait 240 seconds after you press resume, before it reheats. We use it as a glue timer: place the magnets, press resume, and walk away while the glue sets.
Does this pause G-code work for PETG, ABS, or TPU?
Not as written. The 170°C cooldown and 220°C reheat in this routine are PLA numbers. For another material, copy the preset again, change both temperatures to match the filament, and run a test print before trusting it on a print you care about.
Do I have to paste the G-code at every pause?
No. The routine lives in the printer preset's Pause G-code field, so the normal Add Pause option in the layer preview triggers it automatically. Do not also paste the full routine into the per-layer custom G-code box, or it will run twice.
The short of it: a stock pause just stops the printer, and a long pause needs more than that. Park the nozzle, cool it, let the timer handle the glue, then purge, wipe, and prime before it touches your part again. Set it up once in a copied printer preset, prove it on a scrap part, and every magnet insert after that resumes clean.
Pinterest (opens in a new tab) X (opens in a new tab) Facebook (opens in a new tab)